Drive Belt Installation Basic Instructions
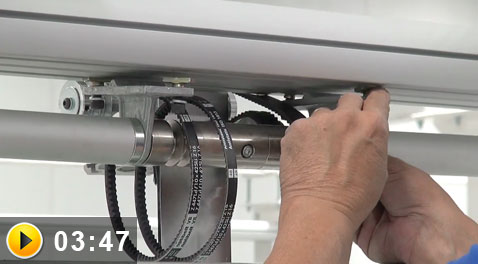
To begin, loosen the jack screw. The jack screw is located at the bottom of the VFD on the mounting plate that connects the VFD to the conveyor track. Back the jack screw all the way out (without removing it completely) so it gives you room to work with the belt.
When installing the belt, first work with the inside belt that is closest to the motor (will usually be located on the “inside” of the system-opposite the side you are on).Put the inside belt on the outside groove of the “drive beam” side. Next, slip the other end of the belt over the “pulley” located on the “outside” of the system (the side you are on will usually be the outside of the system).
On the pulley side of the system, slip the belt into the outside groove of the pulley. Next, move the belt over to the inside groove using the spinning tube. With your left hand, place your thumb along the belt where it comes off the bottom of the pulley. With your right hand, move the drive side of the belt into the inside slot position by guiding the belt and rolling the spinning tube away from you with your right hand simultaneously until you have worked the belt back into the inside slot position of the partable shaft.
Once you have the drive side of the belt in position, use two fingers to pinch the bottom of the belt together. While pinched, perform a half-twist on the belt to move it up and over the idler.
Now you will repeat the same steps with the second belt on this side. It is easier to use the drive tube to assist with getting the belt in place on the pulley. As with the first belt, you will perform the half-twist to get the second belt above the idler on the pulley side.
You will repeat these steps on the opposite side of the VFD with the other two belt replacements, beginning with the inside belt again.
Remember, once completed, do a visual lineup inspection of the belts on both sides of the VFD.
When finished installing the belt, tighten the jack screw back into place being aware of when you start to feel tension. The most important part of installing the belts is keeping in mind that you do not want them to be too tight, as over-tightening will cause lubricant to be forced out of the gearbox and onto the floor via the seals of the gearbox. This is one of the first things a maintenance technician will look for when diagnosing a problem. The belts should have approximately a half of an inch of play in the them when you squeeze them. Once the tension feels right, tighten the half inch nut on the jack screw into place to maintain that desired tension.